
Startup
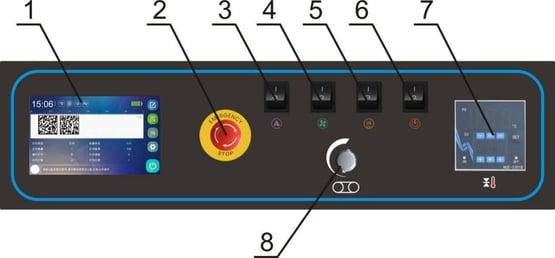
Controlling Panel
|
No. |
Name |
Description |
|
1 |
Touch Screen for Inkjet Printing |
Used to set the working parameters of the inkjet printer |
|
2 |
Emergency Stop |
For emergency stop, press the machine to stop running. |
|
3 |
Printing Switch |
Choose to turn on or off the coding function. |
|
4 |
Fan |
Open or close heat sealing / Open or close fan |
|
5 |
Heat Sealing |
Optional opening and closing heat sealing function. |
|
6 |
Power |
Used to turn on or off the machine power supply. |
|
7 |
Temperature controller |
Adjust the temperature of the heating block. |
|
8 |
Knob |
Adjust the motor speed, can make the sealing speed up or down. |
Powering ON
 |
DANGER! ELECTRIC SHOCK! Please abide by safety operating regulations. |
- Via rotating the Power Switch to start the machine.
- After the connection with the power supply, the indicator light will be on. And the touch display will show the home page, which means the machine is now in the state of standby, and the machine is ready to be operated.
Power connection
 |
WARNING! ELECTRIC SHOCK! Ensure that the socket used has protective grounding wires. Be careful! Power mismatch will damage the machine! Please check the power parameters of the machine by referring to the machine nameplate. Please comply with safety guidelines and national accident prevention measures. |
Power/Ground
- Check whether the power supply voltage is consistent with the voltage in the machine’s nameplate.
- Ensure the machine is properly connected to a grounded receptacle, so as to avoid the fire or electric shock (grounding line is the yellow green double color line).
- The cable must be free to move to avoid extrusion.
- Once the cable is damaged, please replace immediately.
- When there is machine malfunction or when the machine needs maintenance, please cut off power supply.
- If the machine will be idle for a period, please pack the cable.
Startup procedure
- Connect the power and press the start switch, the indicator lights up, adjust the speed control knob, then the transmission parts run synchronously.
- Fine tune printing wheel knob, make the printing wheel rotating. Adjust it to the appropriate pressure and fix the limit screw.
- Turn on the heater switch, then the green light of temperature controller lights up. According to the material and thickness of the packing bag, adjust the temperature controller to the desired temperature. When the heating block begins to warm up, the machine shall be turned on at the same time.
- That whether it is necessary to turn on the fan for cooling depends on the material and thickness of packing bag.
- Flatten and align sealing opening, then feed the bag by aligning the bag opening with the feed opening. When the bag opening is gripped by the sealing belts, which makes the bag moving forward automatically, at that moment, please do not push it in or pull it out by force, otherwise there will be irregular sealing or breakdown.
- If it is found that there is dirt attached to the sealing belt or the heating block, stop the sealer and clear it. Do not clear the dirt with hands when the temperature is high
Stop operation
In order to prolong the service life of the sealer, before turning off the machine, please return the temperature-regulating knob to position 0 firstly, and turn on the fan. At the same time, the indicating temperature begins to fall and the sealing belt should still be in state of running. After several minutes later, when the temperature drops below 100℃, it is allowed to turn off the fan and main power switch.
Emergency stop switch
At any time, the machine stops immediately after pressing the emergency stop switch. The emergency stop switch is a self-locking switch, and it needs to be rotated by a clockwise 120 degrees to open.
Commissioning
Replacement and adjustment of the sealing belt
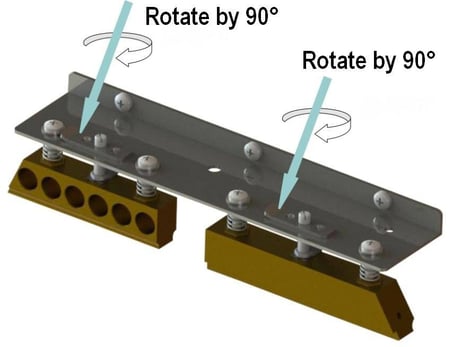
- Remove the safety cover, after the heating block cooling, rotate retaining washer by 90° on both upper heating block and upper cooling block to lift both two blocks, then loosen the springs on both embossing roller and pinch roller, meanwhile, remove the guiding belt, to make it ready for removing sealing belts (as below figure).
- Move the driven wheel seat (adjusting block) towards heating block, and remove the sealing belt.
- Replace it with a new sealing belt and install the guiding belt back.
- Adjust the driven wheel, heating blocks, cooling blocks, and pinch roller etc. to the original position.
- Connect the power supply to test the machine.
- Install the protection cover. When the temperature reaches the setting temperature, the machine is ready for work.
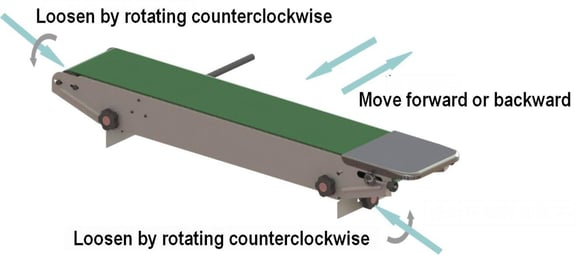
Forward-and-backward adjustment of conveyor table
Loosen the adjusting knobs on both sides first, and then move the conveyor table forward or backward in the long slot along the feet. Tighten the knobs on both sides after finishing the adjustment.
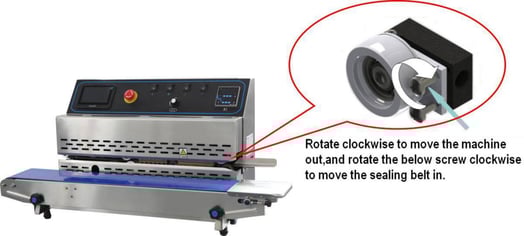
Adjustment of sealing belt deviation
If the sealing belt deviates, the sealing belt can be adjusted by adjusting the screws in the driven wheel seat (adjusting block) (as below figure).
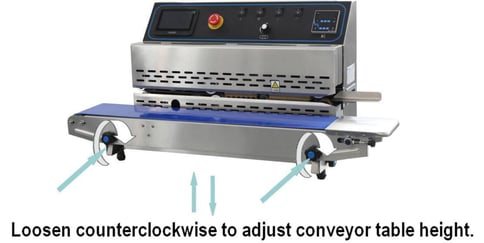
Adjustment of conveyor table height
According to different materials, if it is needed to adjust the height of the conveying table, adjust the conveying table height by the adjusting knob in front of the conveyor table (as below figure), and tighten it after adjustment.
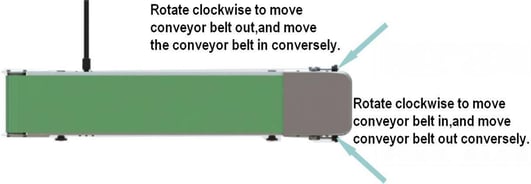
Adjustment of conveyor belt deviation
If the conveyor belt deviates, the conveyor belt can be adjusted by adjusting screws in the right side of conveyor table (as below figure). Keep the conveyor belt under tension state when adjusting, and it is not allowed to adjust when the conveyor belt under relaxed state.
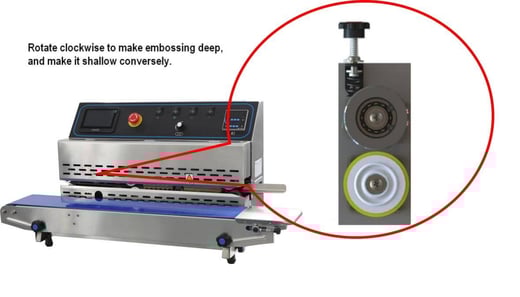
Pressure adjustment of embossing wheel
If there is a need to make the pattern of the embossing wheel deep or shallow, adjust the adjustment knob at the top of the embossing wheel (as below figure).
Standard Operation & Parameter Setting
|
|
TAKE CARE! INJURED! Please refer to this manual to operate this machine. |
|
|
TAKE CARE! CLAMPED! |

|
|
TAKE CARE! SCALD! When sealing, the temperature outside the surface of heating block can reach over 200℃. Even after cooling, it is still with high temperature. |
- If any question about operation and function of the machine, when related information is not included in this manual, please contact manufacturer or distributor.
- If machine is not running in normal situation or produces strange noise, please turn off power immediately to stop machine running and cut off power supply.
- Once in trouble, please contact manufacturer or distributor.
Preparation, adjustment and inspection before operation
- This machine is equipped with a grounded three-hole socket. The power supply used should be well grounded to ensure safety in production.
- Before use, you need to check the cartridge chip and metal sheet for residual ink. If there is ink, it needs to be cleaned or it will burn out the jetty.
- It is recommended to test the ink condition by placing a piece of white paper under the ink cartridge before it is inked.
- When in first time use or when there is too long time interval after use, the electric heating element will be affected with damp, it should be operated in normal operation after preheating in low temperature for a few minutes.
- According to the bag shape and size, adjust the conveying table height and forward-and-backward position.
- According to the shape and size of the sealing line to the mouth, adjust the position (inlet).
- According to thickness of the sealing material, adjust upper and lower heating blocks, and the clearance between upper and lower cooling blocks, adjust the pressing force of retaining washer to control the clearance between the two sealing tapes, adjust clockwise to lift (increase clearance) and counterclockwise to fall (narrow clearance). The clearance between two sealing belts is equal to about the thickness of one layer of packing bags, so that the sealing fastness and embossing sharpness of the bag can be ensured and the clearance between two ends of the seal are not too long.
Parameter Setting
 |
TAKE CARE! DAMAGE! Unreasonable parameter setting may damage machine or shorten machine service time. |
- Unreasonable parameter setting may damage the machine or shorten the service time.
- Unreasonable parameter setting may cause all procedures or sealing not to be completed correctly.
- If any question about machine’s operation or function of the machine, please contact the manufacturer or distributor.
- Speed Parameter Setting
- There is a speed adjusting knob in the control panel to adjust the sealing speed, clockwise rotation is to increase the sealing speed, counterclockwise rotation is to reduce the sealing speed.
- Optimal Parameter
- The distance between bag sealing center to the edge of the bag is 10 ~ 20 mm.
- Bag sealing quality is determined by the three elements of heat sealing temperature, sealing speed and pressure.
- Temperature setting should be adjusted slowly from low to high according to the thickness of the bag.
- Speed setting should be adjusted slowly from slow to fast according to the sealing effect.
The sealing pressure is adjusted to appropriate pressure before the machine leaving factory, and it is suitable for most product bags. If after adjusting temperature and speed, the bags cannot get the ideal sealing effect, please adjust the belt-pressing wheel to make pressure change from low to high slowly so that to get the expected sealing effect.
Common material heat-sealing temperature reference table
|
Material Name |
Thickness (um) |
Recommended temperature setting (℃) |
Heat-sealing speed (m/min) |
|
LDPE |
30~160 |
105~150 |
6~10 |
|
MDPE |
40~120 |
115~120 |
7.2~10.2 |
|
HDPE |
40~90 |
125~150 |
7.2~10.2 |
|
PP |
40~60 |
135~160 |
7.2~10.2 |
Menu

1.The first line: display the current system time and function
2.
3.
4.
5.
6.
7.
8.
9.
10.
11.
12.
13.File editing: click to edit a new file
14.File selection: click to select the internal file saved in the machine
15.Advanced options: setting of machine general and printing parameters
16.Setting: general and printing parameters settings of the machine
17.Start printing: After the ink cartridge is installed, click this button to print (note: do not insert or remove the ink cartridge when printing); when printing is not required, click this button to stop working.
File Edit

1.Add fixed text content
2.Add variable date and time
3.add pictures
4.Add barcode
5.Add a QR code
6.Rotate selected objects (fields or graphics)
7.Add table
8.Add serial number counter
9.Add line segment
10.Add a circle or ellipse
11.Add rectangle
12.Move or zoom the selected object
13.Delete a single selected object or clear information
14.Edit and modify the selected object
15.Fine-tune the selected object up, down, left, and right
16.When there are multiple field objects in the information area, switch the selected field object
17.Click this button to save information, create new information or modify saved information
Preview
1.The file name of the saved information is displayed in the red solid line frame. You can click the file name to preview the file content, edit the file content or print the selected file
2.
3.
4.
5.
6.
7.
8.
Advanced

1.System time:adjust the current system year, month, day, hour, minute, and second
2.Language:select the desired language
3.Brightness:adjust the brightness of the screen backlight
4.Buzzer:when you select the ON state, there will be a "di" sound at the beginning and end of printing; if it is not turned on, there will be no sound when printing
5.Power Saver:when the on state is selected, the machine will automatically reduce the brightness of the screen after no operation to protect the life of the screen; otherwise, it will not
6.Calibration:when the touch screen is not sensitive, you can enter the screen calibration for calibration

When you need to print fonts that are not in the system, you can copy them on this page

1.Direction: the direction in which the font is printed, forward, reverse, forward and backward, reverse direction can be selected
2.Inkjet mode:The cartridge has two nozzles, you can choose to spray left or right
3.Trigger: electric eye
4.Speed: the faster the bag moves, the smaller the print speed value is set
5.Delay: the larger the delay, the later the printing position will be after the sensor is inducted, the smaller the delay, the forward the printing position
6.Grayscale:Print gray scale: adjustable font depth, the larger the number, the darker the color(No more than 2 is recommended)
7.Pulse width: recommended to be set to 110-150
8.Voltage: recommended to be set to 9
9.Sync-wheel: close this button